I built this kora during the Christmas '97 holiday in just a few days
of by-no-means-constant tinkering. Total cost was in the area of
$20 - $30 using all new materials.
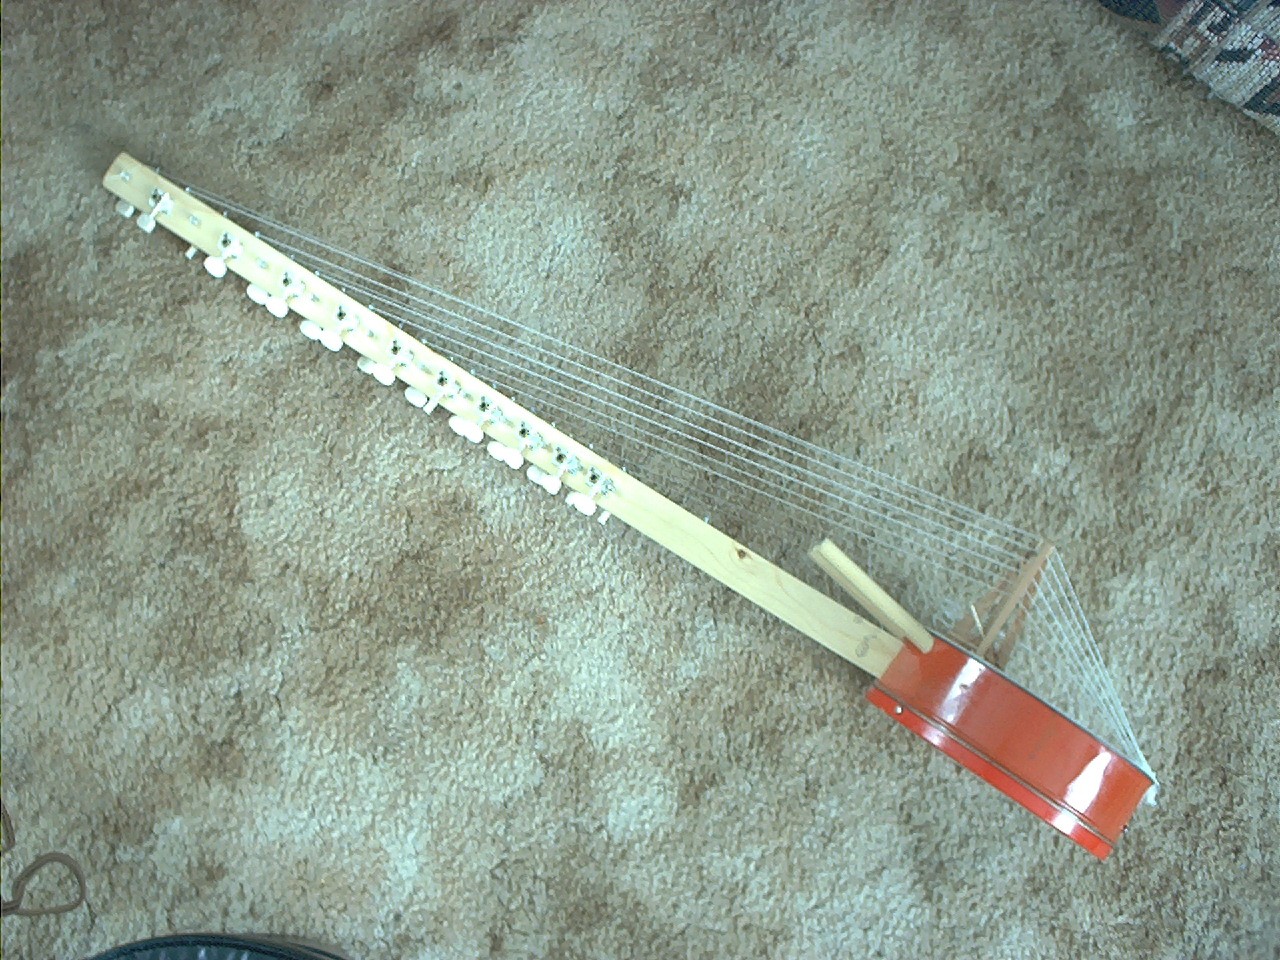
The finsihed instrument is sturdy yet lightweight, weighing just
over 2 lbs, and measures 44 3/4" tall by 10" wide by 8 3/8" front
to back.
This is a full list of materials:
- One 11/16" x 1 1/2" x 44 3/4" long strip of hardwood. Type of
hardwood not important unless you opt for zither pins as tuners,
in which case, I'd recommend using rock maple which holds these
pins best.
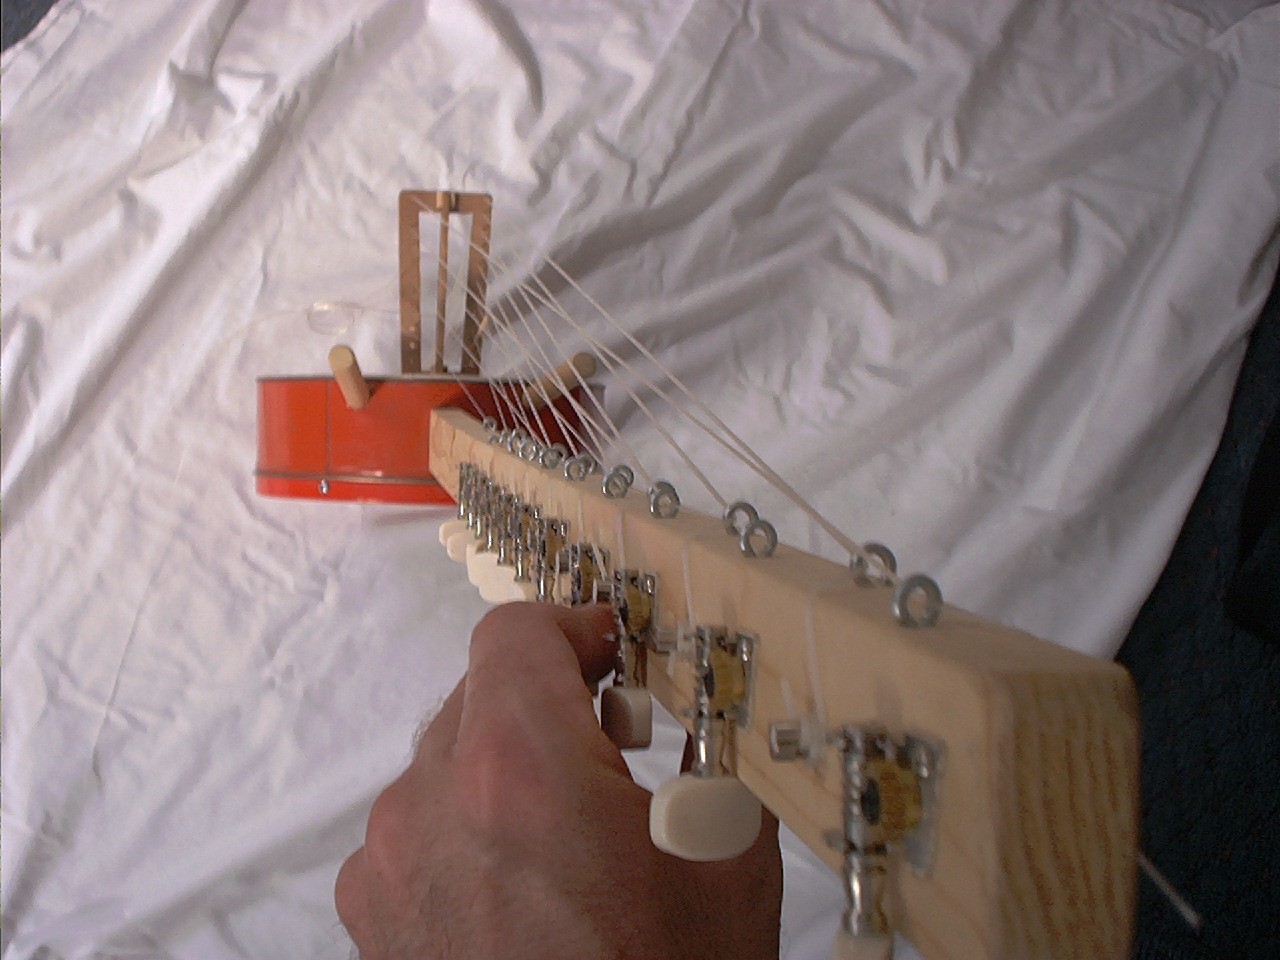
- 21 guitar type tuners. Zither pins can be used instead.
- 21 very small screw-eyes that route strings and act as nuts.
- A few feet of.065" monofiliament weed-whip line & small rolls
of .050" and .040" monofiliament weed-whip line, available at
all Tru-Value hardware stores year-round & K-Mart in season.
Also .024" & .015 momonofiliament fishing line available at
any sporting goods store.
- A square foot of 3/16" to 1/4" thick preferably birch-faced
plywood.
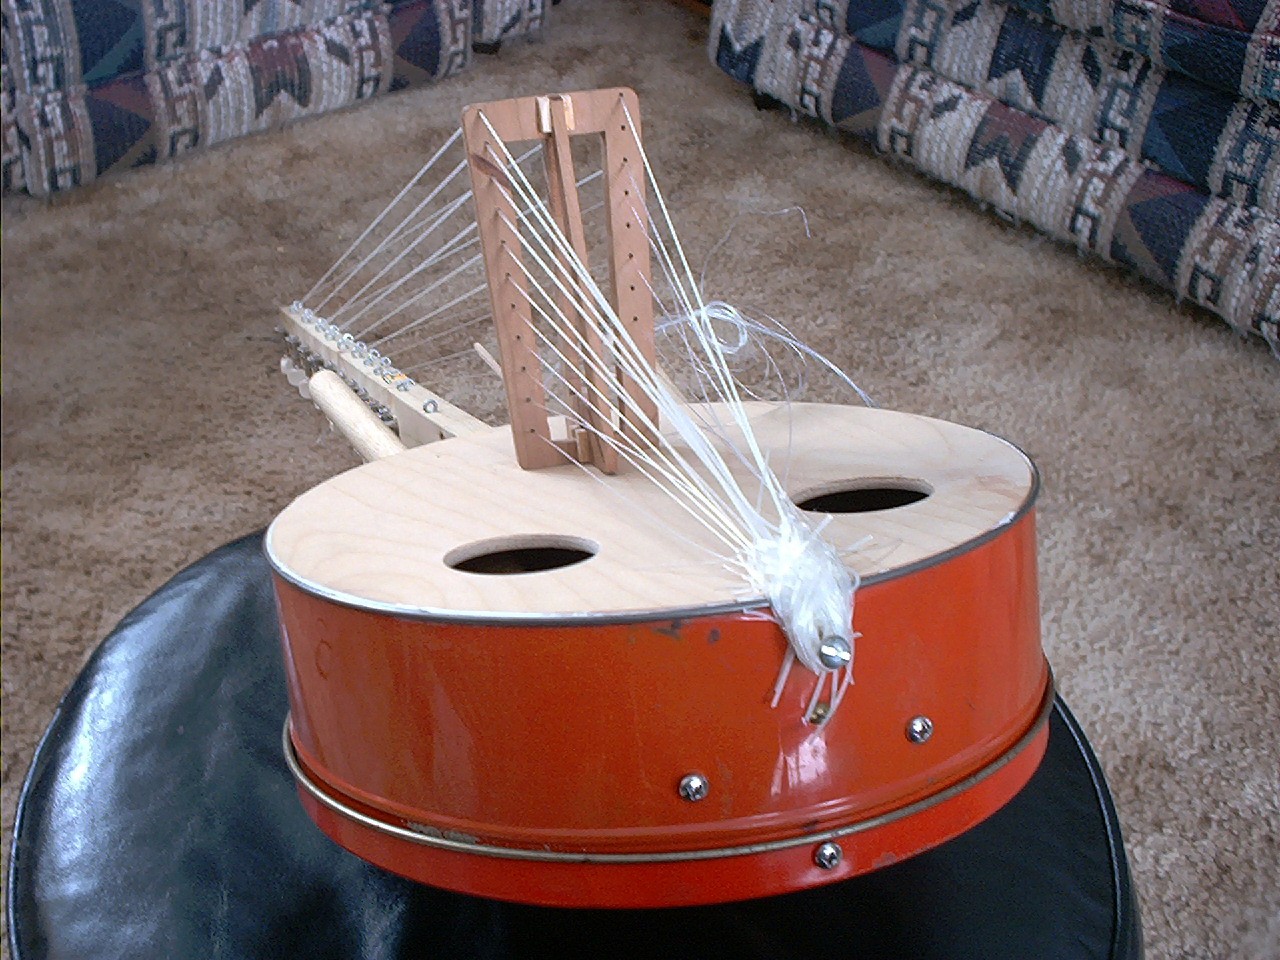
- A large cake tin -- the kind, with a tin lid, that fruitcakes
are sold in. Mine measures 3 1/4" tall by 10 in diameter. Size
is not that important. There is no string-strain or pressure on
the tin itself as any such strain is completely borne by the
"straight-through-the body" neck. The traditional African
instrument utilizes a big skin-covered gourd instead of a cake
tin & wooden affair.
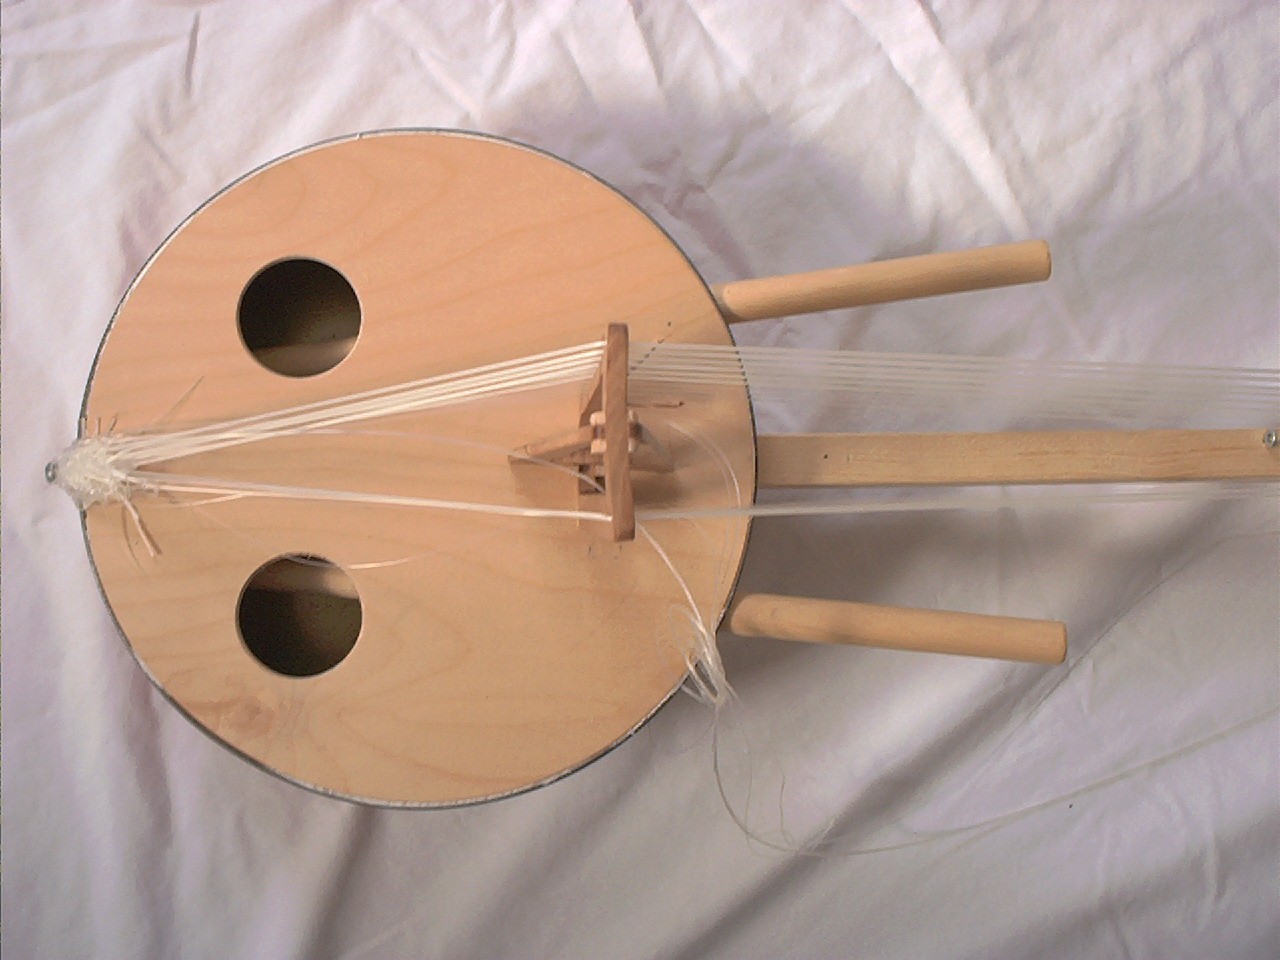
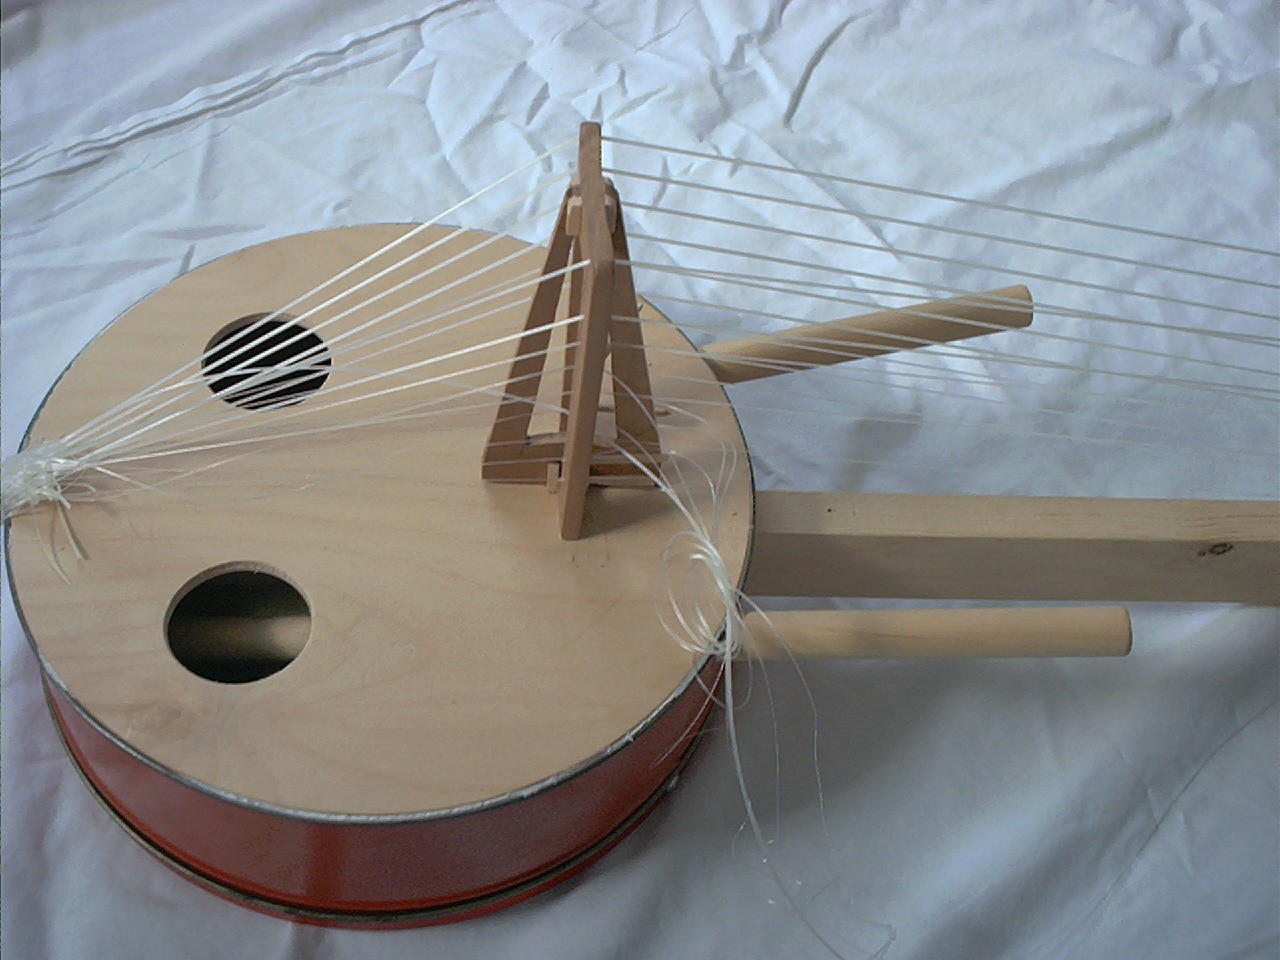
- One 5/8" diameter dowel rod to make the two hand holds.
- One hefty, 2 1/2" long woodscrew (with smooth upper shank) to
attach strings to.
- A few small scraps of hard and soft wood from which to make
braces, bridge etc.
*******************************************************************
CONSTRUCTION STEPS
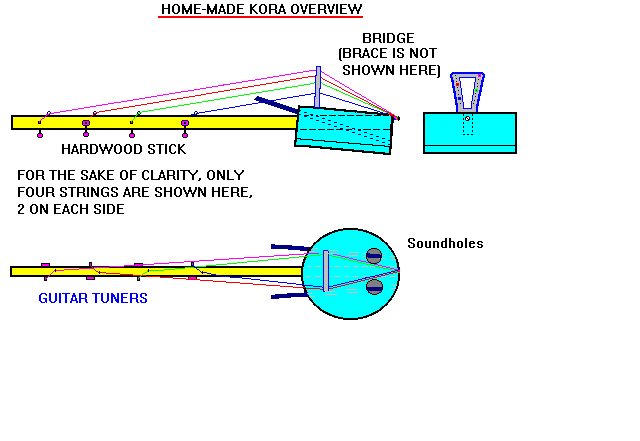
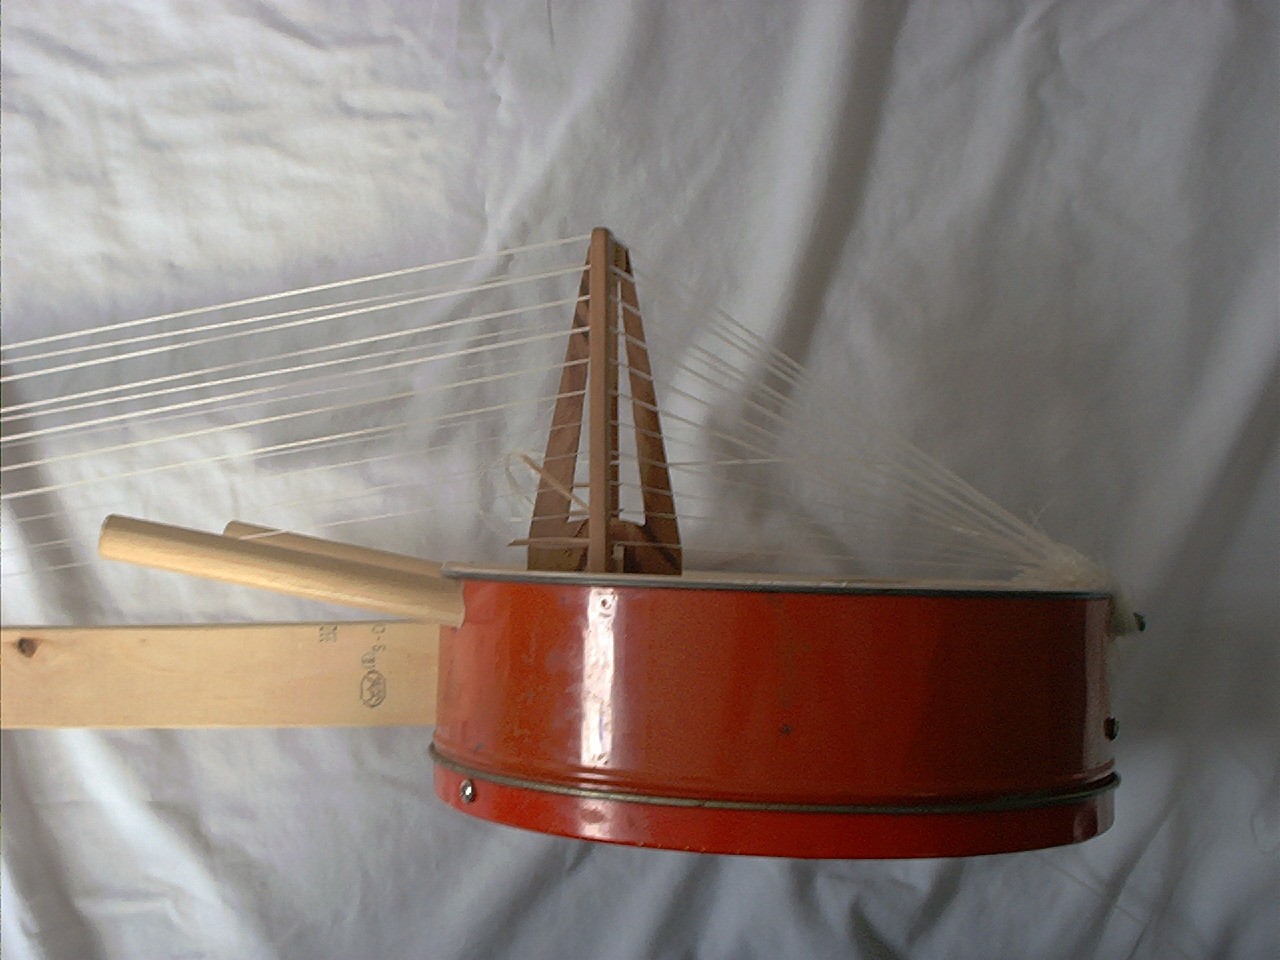
Body/resonator
Take off the lid & turn the cake-tin upside down. Using a hefty
utility knife, carefully cut out all of the bottom tin EXCEPT for
leaving a 3/16" wide ledge all around the perimeter. The
soundboard (which is recessed a bit) rests on & is glued onto this
ledge.
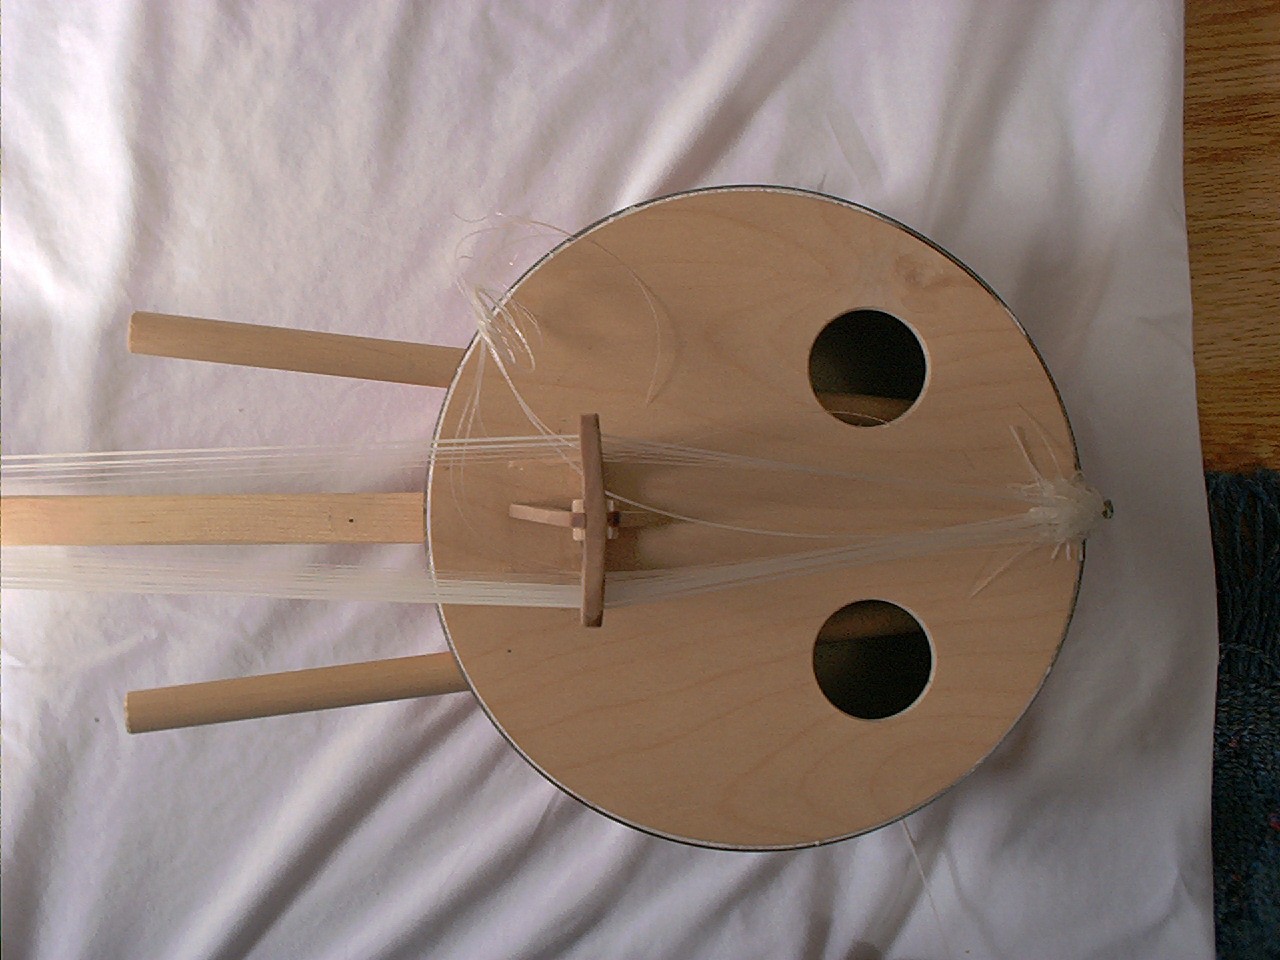
Cutting the soundboard
Make this a tad larger in diameter than will fit into the ledge in
the body then carefully sand/file the perimeter til it just plops
into the ledge. Cut the two 1 3/4" diameter soundholes as shown in
the.gif drawing. Glue the soundboard onto the cake-tin bottom's
ledge using vinegar-smelling 100% silicone sealant (avoid
"Silicone 2" at all costs).
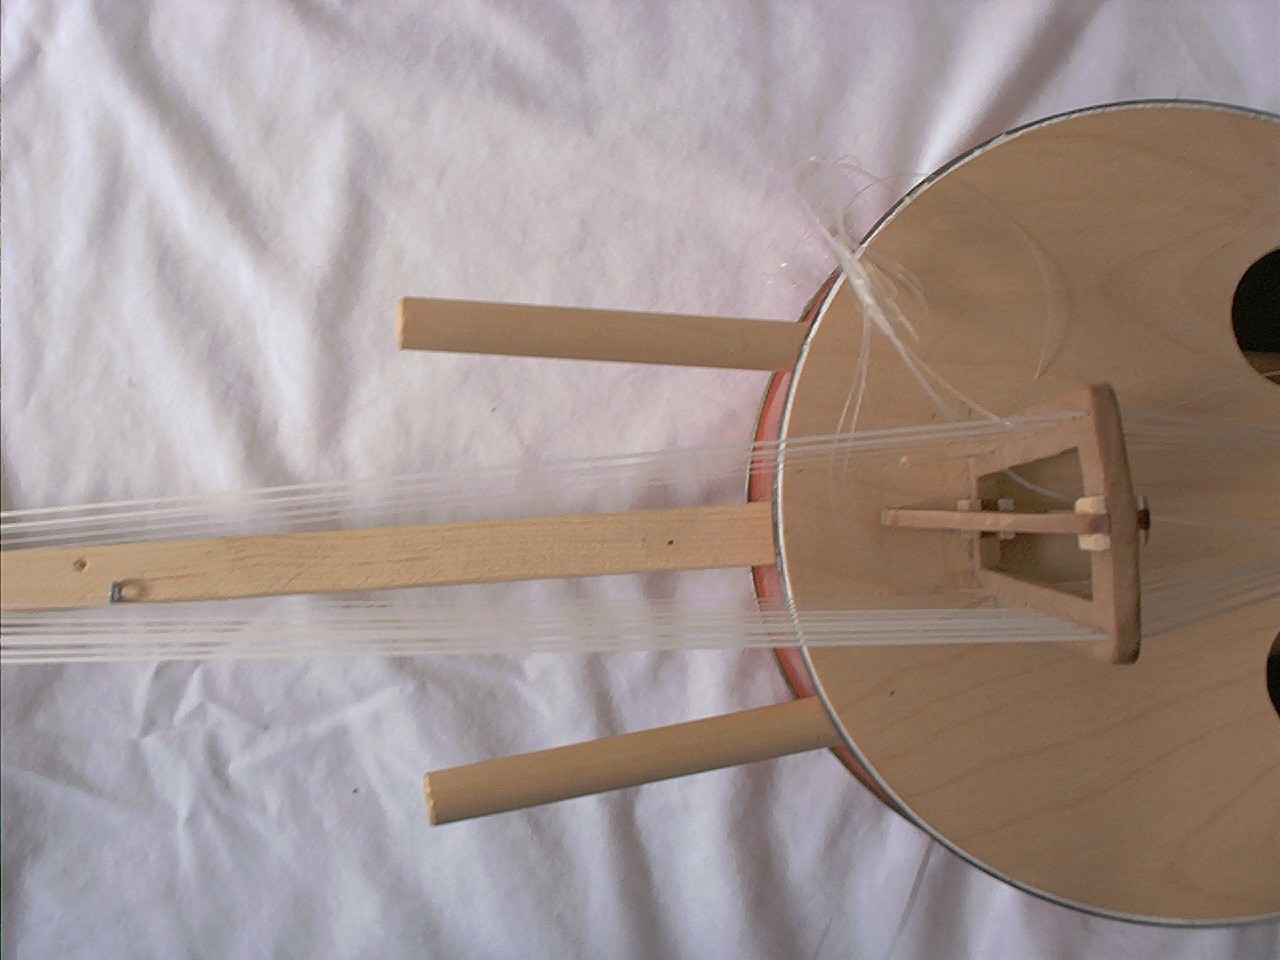
Adding the underside brace
Made of any hardwood about 6" long, 3/16" wide and 3/8" tall at
the center, tapering off to 1/8" or so at each end. Glue this
below where the bridge will sit. Part of this may have to be
notched a bit to allow the hand-grips to pass. More on this later.
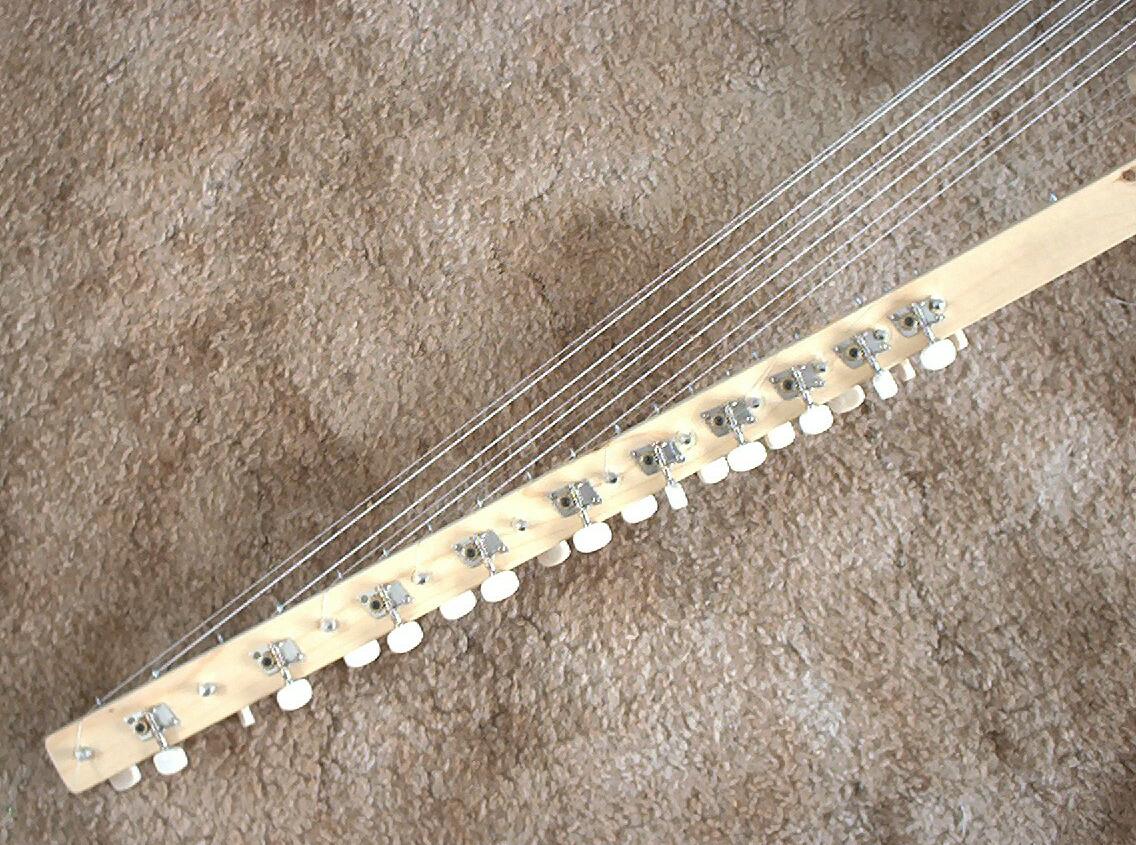
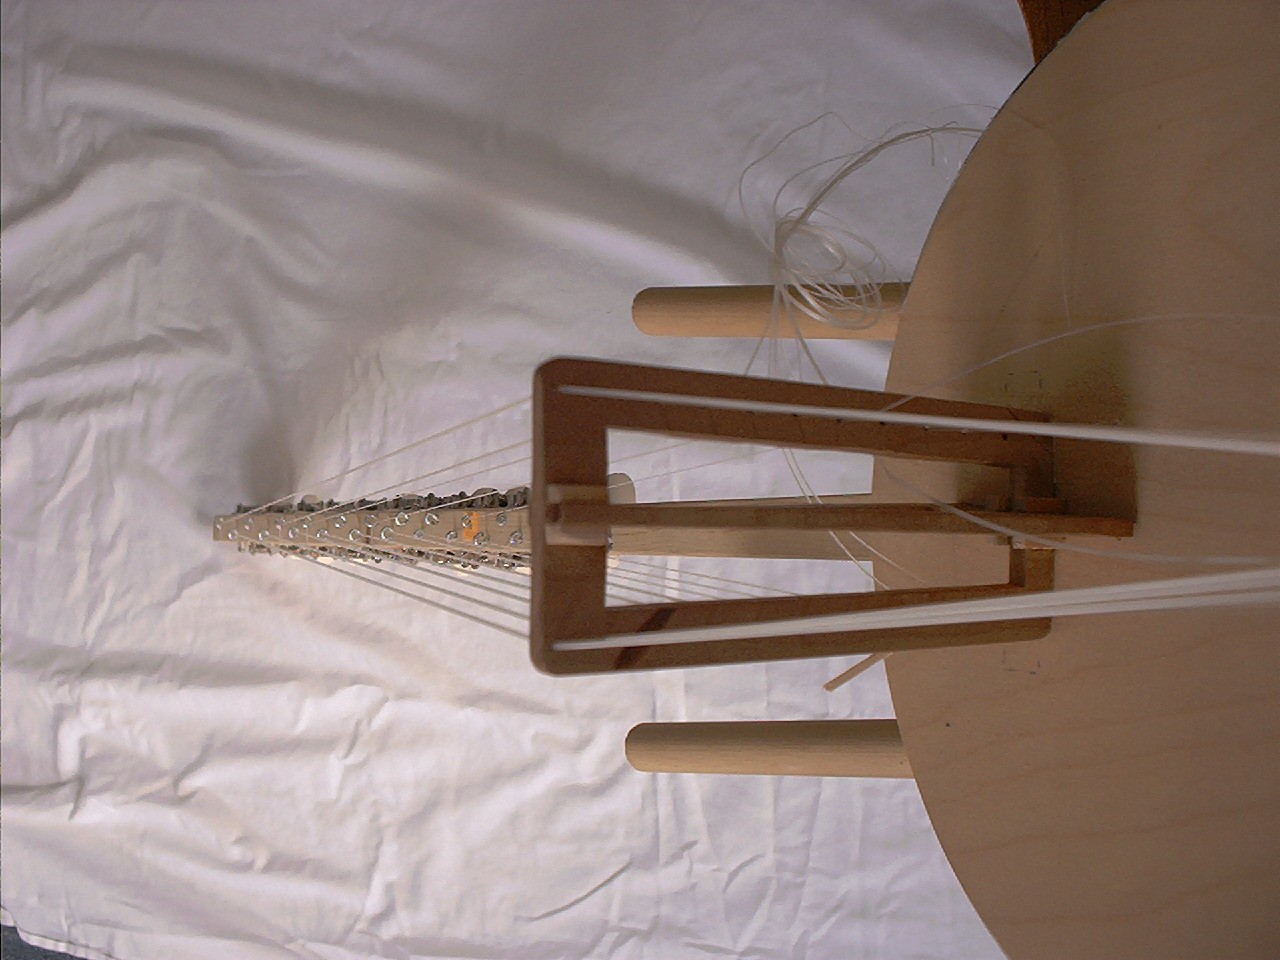
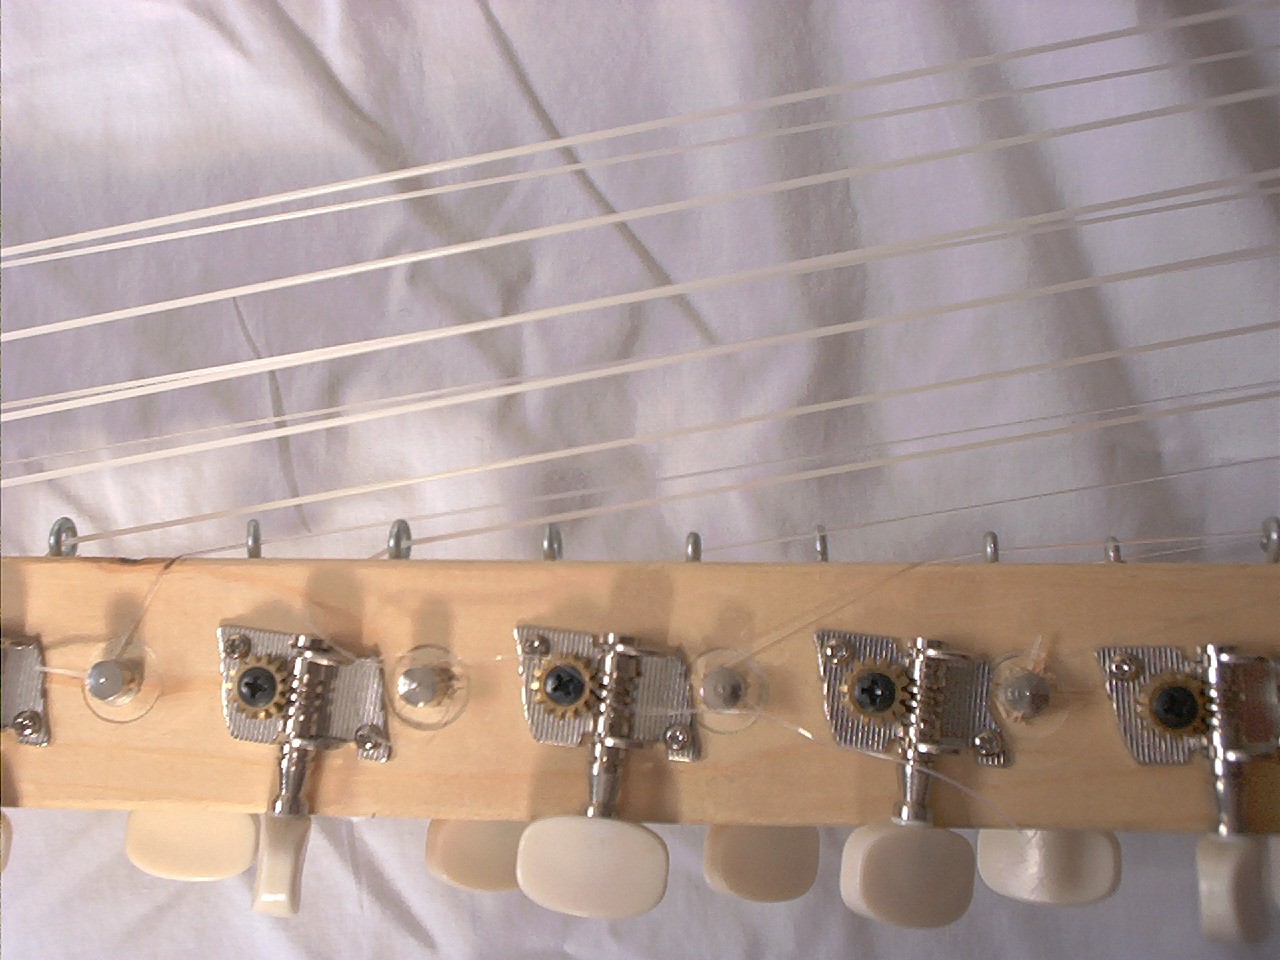
Mounting tuning gears along the neck
One would think adding these 21 tuners would make the neck
excessively heavy, but this is no problem at all - particularily
as the instrument itself is so very light. Mount 10 tuners on the
neck along the side that will be played by the right hand and 11
tuners on the neck along the side that will be played by the left
hand.
Locate them like so:
Along the side played by the right hand, locate tuners (center of
post) at these distances from the tip end of the neck (the end
furthest from the instrument's body): 2 3/8", 5 3/4", 8 5/8",
11 1/8", 13 5/8", 15 3/4", 17 3/4", 19 1/2", 21 1/4" & 23"
Along the side played by the left hand, locate tuners (center of
post) at these distances from the tip end of the neck (the end
furthest from the instrument's body): 3/4", 4 1/8", 7 3/8", 9 7/8",
12 1/2", 14 3/4", 16 3/4", 18 5/8", 20 3/8", 22 1/8" & 23 7/8"
Installing the screw-eye string-routers/nuts
Locate these 1" or so in front of & in line with each tuner.
Towards the higher pitched 5 or 6 strings strings it is necessary
to sink the screw-eyes quite deep into the wood or even cut/reform
them, to make a smaller/shorter eye. This is done to keep adjacent
lower-pitched strings from hitting/buzzing where they pass over a
higher-string's screw-eye ,
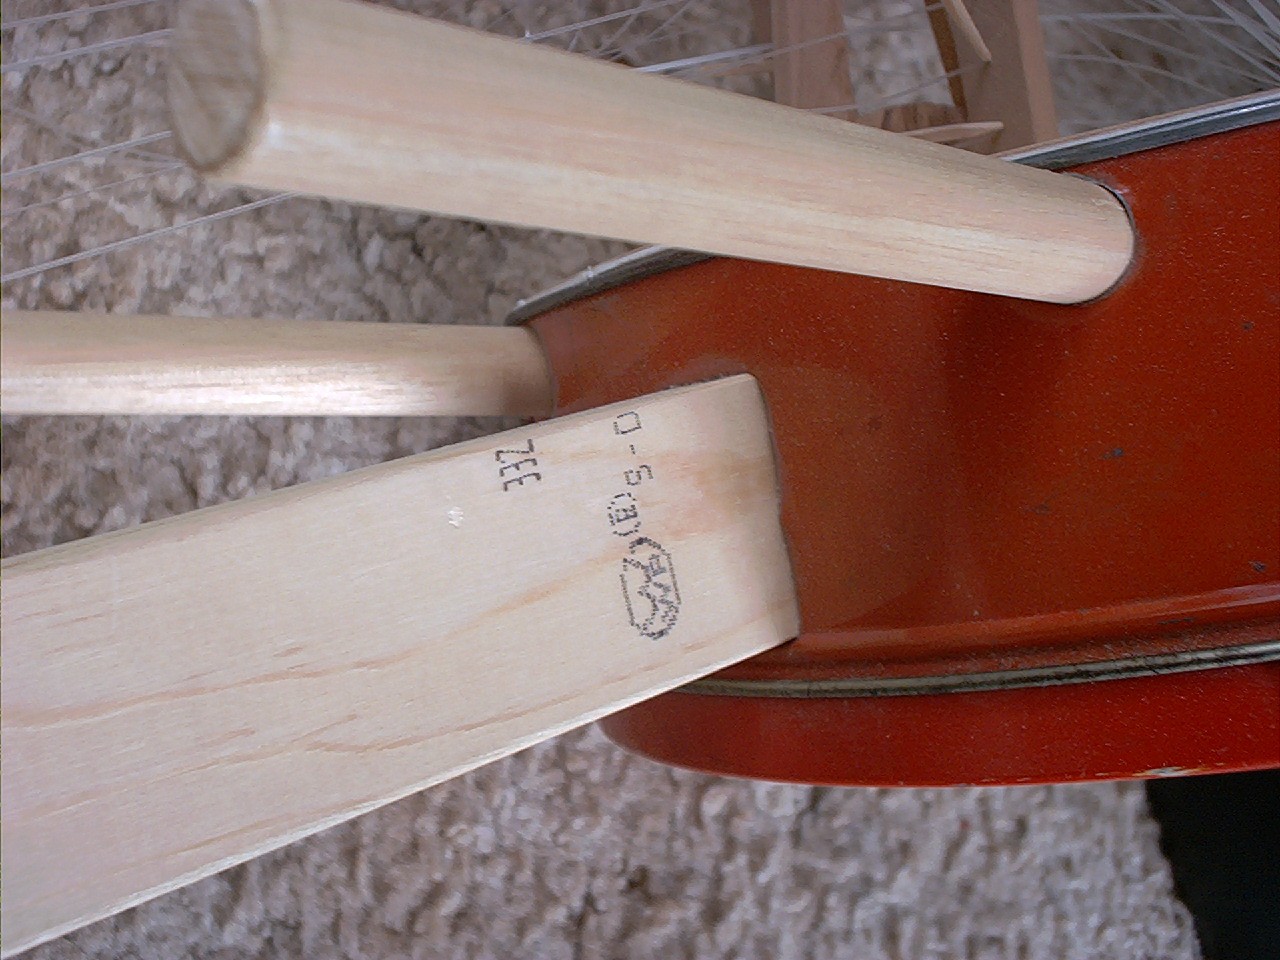
Mounting the neck to the body
Cut an angle on the end of the neck so it will match the tin on
the inside flush. Lay masking tape over the area on the outside of
the cake-tin that is to be cut to allow the neck to pass through.
Draw a rectangle the same dimensions as the neck (the top surface
of the neck should be 7/8" below the top of the soundboard). Very
carefully, using a stout utility knife, cut out the rectangle
where the neck will pass. Make a deliberate attempt to cut a bit
smaller if anything, as this makes for a tight fit when the neck
is forced through. Secure the end of the neck to the tin with two
woodscrews - the bottom one being just 3/4" of an inch long or so,
but the top one being stout & 2 1/2" long. All the strings attach
to this screw (leave about 5/8" of this screw protruding -- it can
be cranked in some once all the strings are on). It is very
important to fit a small block of hardwood tightly into the space
(on the inside of the tin & closest to the bridge end) between the
neck and the bottom of the ledge/soundboard, right up against the
tin's sidewall (position of this block is shown in the next .gif
drawing). This takes bridge/string pressure off of the tin, which
might contort otherwise. Glue this block to all possible surfaces
using 100% silicone sealant (the type that smells like vinegar).
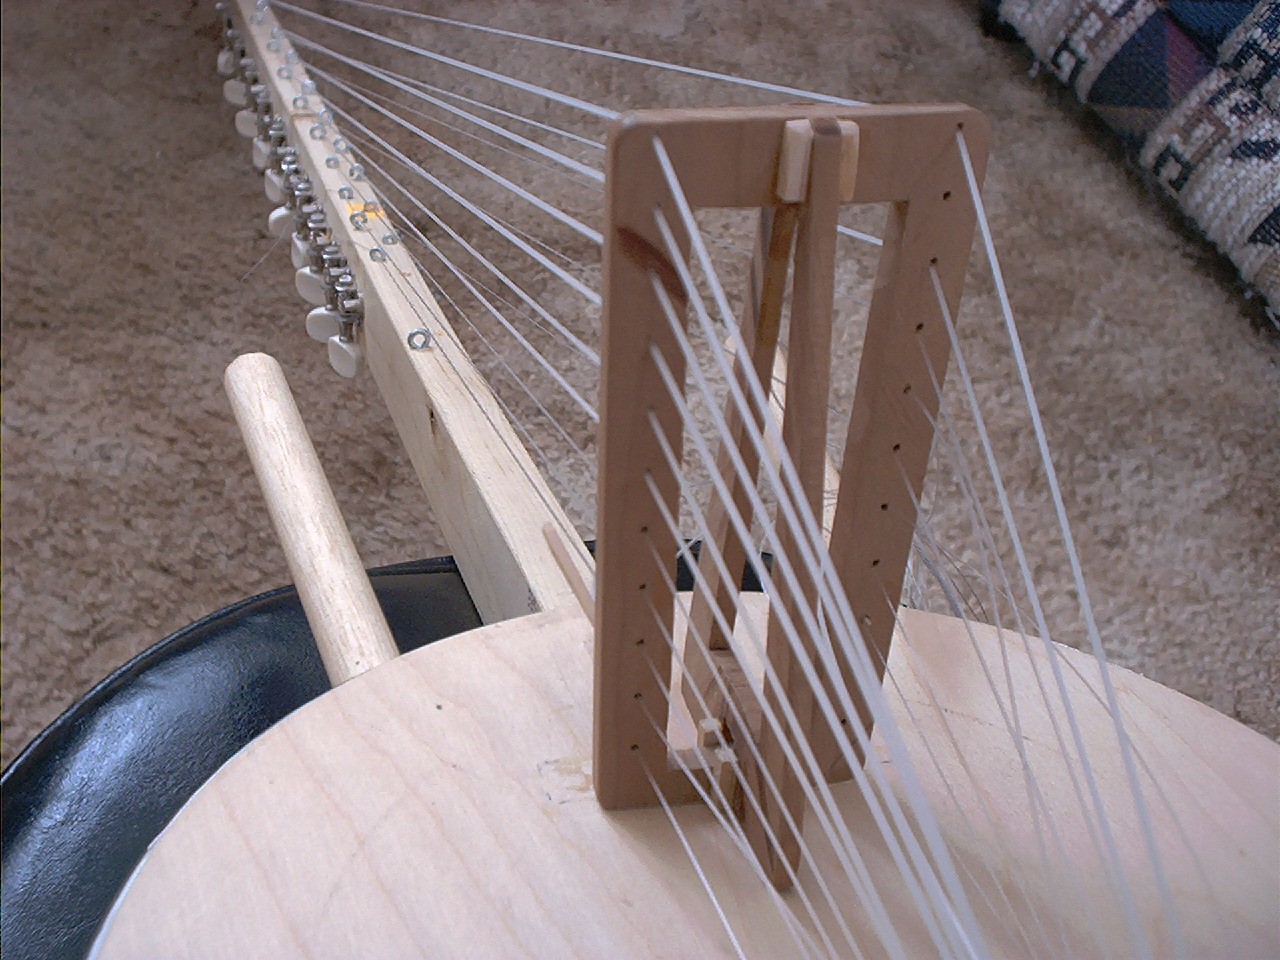
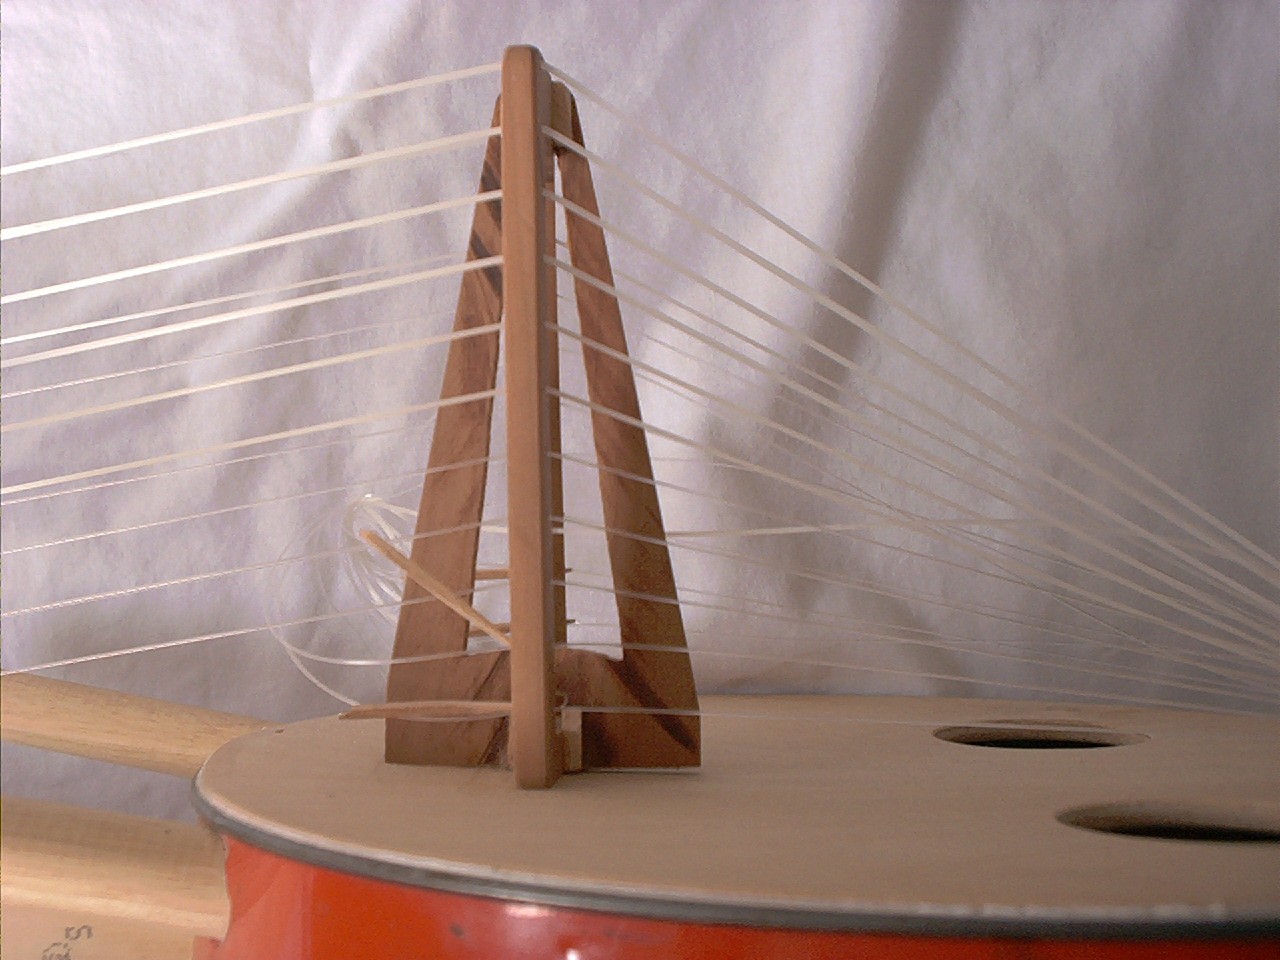
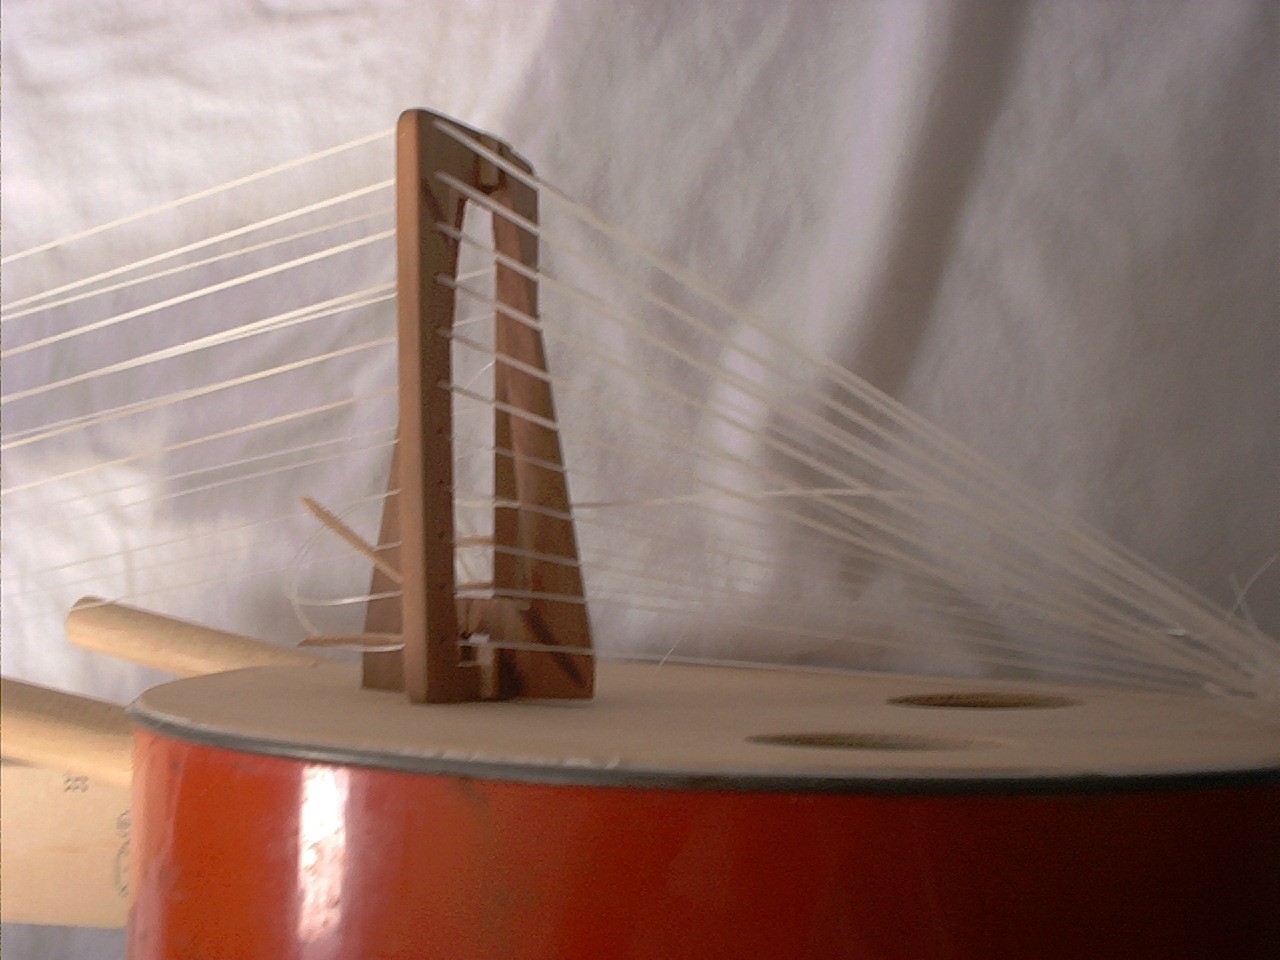
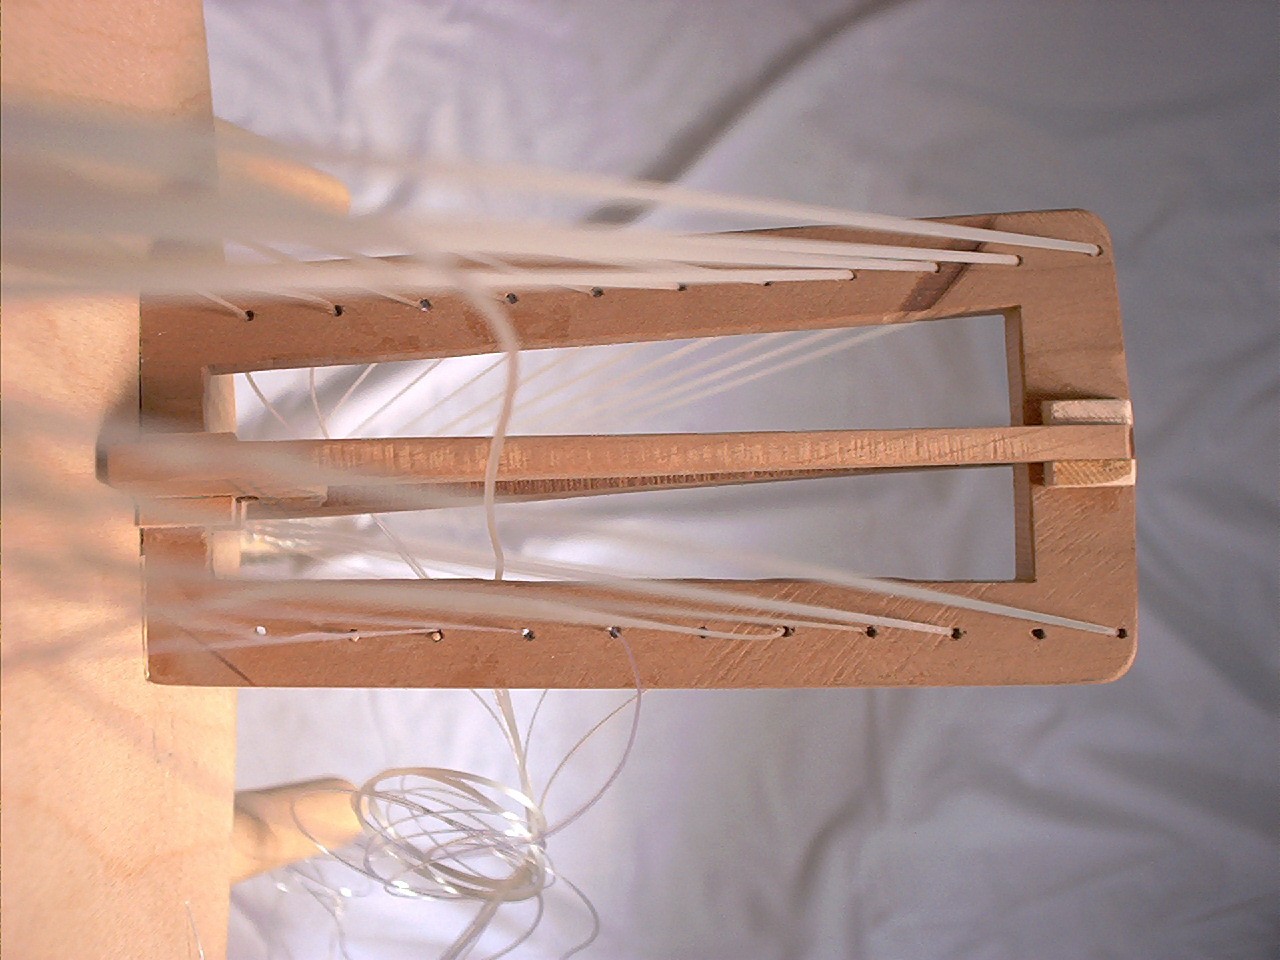
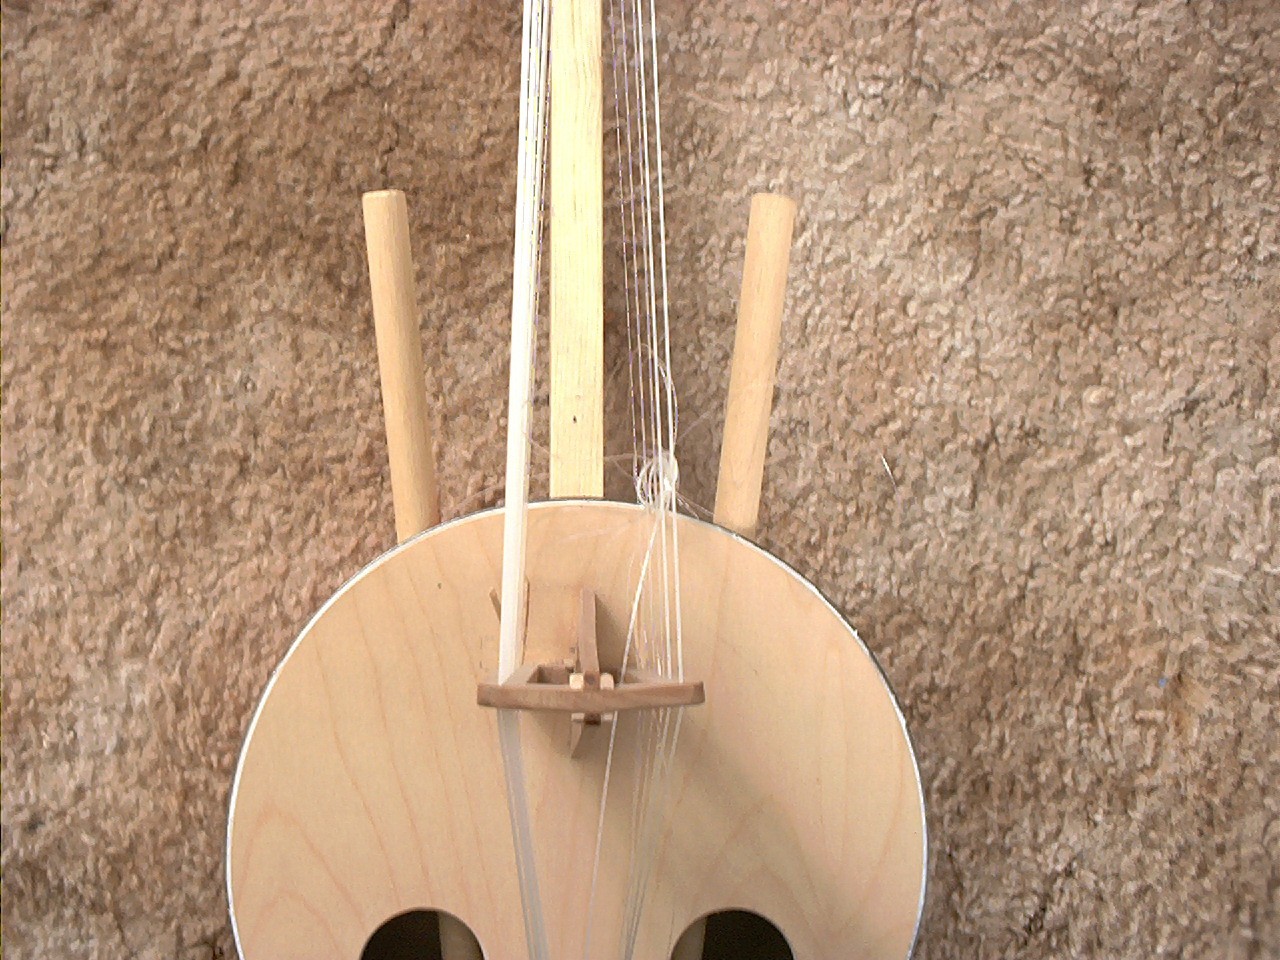
Bridge, string-holes & the brace to keep bridge upright
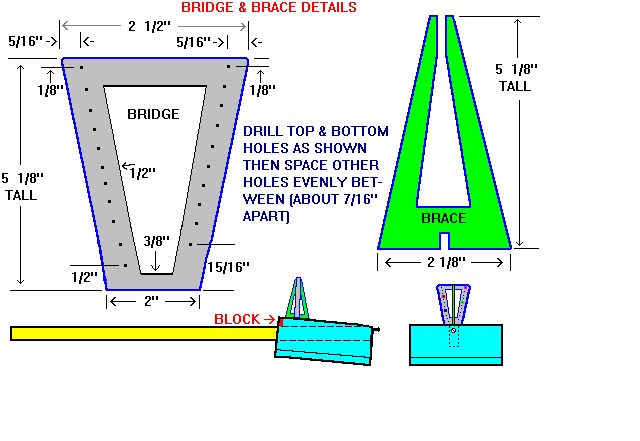
I have used both hardwood and the same 3/16" birch plywood used
for the soundboard to make the bridge and braces and both woods
work fine. Use a 1/16" drill-bit to make the holes for the strings
(a slightly larger hole must be drilled for the low C string which
is the longest string on the side of the instrument played by the
left hand).
A brace is not used traditionally but I find it works perfectly to
keep the ever-present bridge-tipping at bay & don't believe it
detracts very much from the overall tone/volume, it being quite
light. The brace "fits inside" the bridge & is glued to the bridge
wherever possible. Rubber-bands around this brace provide ample
clamping while the glue is drying. It should be noted (after
having broken the first one myself) that if you use non-plywood
for this brace, it is fragile! Once glued to the bridge, it is
very durable, but treat it gently before gluing. Also, cut the gap
where the brace attaches to the top of the bridge very carefully
-- make this gap just a tiny fraction larger than the thickness of
the bridge, lest it break while clamping. Short lengths of 1/8" x
1/8" (or so) wood are then glued into all 8 angles where the brace
meets the bridge for extra reinforcing. Carefully sand the bottom
of this bridge/brace affair flat. This bridge does not need to be
glued on. It's best to install & tension the shorter strings first
though to keep the bridge from tipping while stringing. Make sure
the bridge remains upright and in proper position as you install
and tension the strings. Position the working edge of the bridge
(the edge closest the tuners) 2 3/8" from the edge of the
soundboard.


                             Hand grips

These provide a very practical & satisfying way to hold the
instrument & position the thumbs and index fingers properly for
playing. I used two 14" lengths of 5/8" dowel rod for this
purpose. Refer to the accompanying illustrations. Drill a guide
hole in the inside end of both rods to receive the short
woodscrews that go through the tin side and secure the rods at the
kora's end. Try to make the holes through the tin side to be just
a bit under-sized, so that when the rods are forced through to the
other side, they will be held tight. I initially intended to
strengthen where the rods go through the holes in the tin sides
with cement etc, but now don't think this is necessary - the
instrument being so light. Make sure these rods don't threaten to
hit the bottom of the brace glued to the soundboard's underside.
If so, whittle a bit off the rods (& maybe even a bit off the
brace) til there's no threat.


              Stringing and Tuning the Instrument

Four different gauges of nylon line are used. I could find no
information at all about the gauges of nylon line used by
traditional African players, so had to do a LOT of
experimentation, which is ongoing. The below is a workable system
which plays and sounds good. Changes/improvements however, will be
reported here.
My system for determining what gauge to use for a particular
string is to start with a fairly thick line, see if it breaks when
tuned to pitch, if it does, I substitute a slightly lighter gauge.
I find that the string gauge just short of "breaking-thickness"
produces the clearest, loudest note. The gauges below are the
results of this experimentation:
.065" monofiliament nylon weed-whip line for the longest string
on the side played by the left hand (the low-C string).
.050" monofiliament nylon weed-whip line for the 2nd, 3rd & 4th
longest string on the side played by the left hand.
.040" monofiliament nylon weed-whip line for the 5th & 6th
longest strings on the side played by the left hand AND for the
longest three strings on the side played by the right hand.
.024 monofiliament nylon fishing line for the 7th, 8th, 9th,
10th & 11th longest string on the side played by the left hand
AND for the 4th, 5th and 6th string on the side played by the
right hand.
.015 monofiliament nylon fishing line for the 7th, 8th, 9th &
10th longest string on the side played by the right hand.
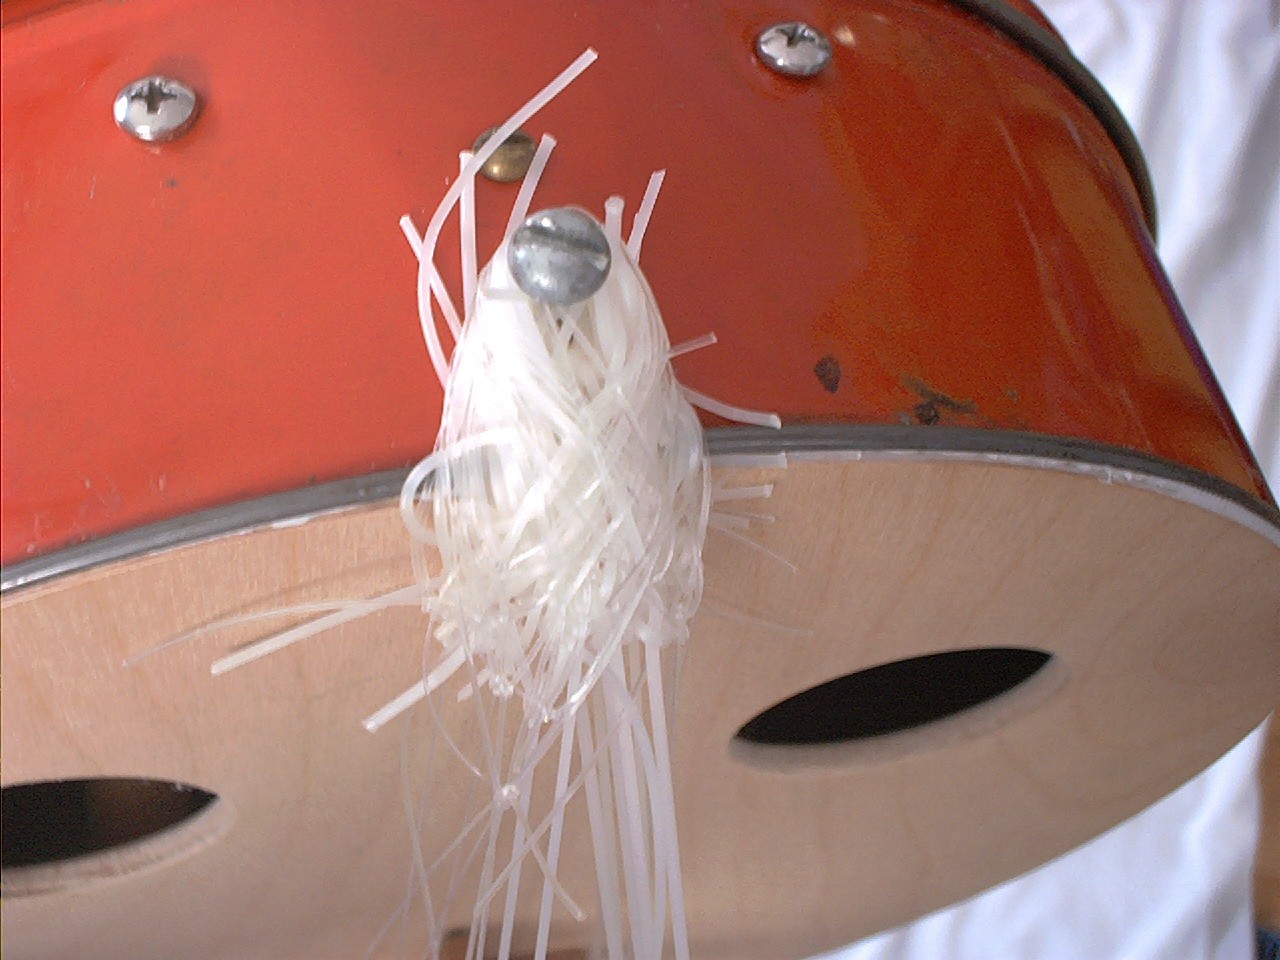
Attach each string to the hefty screw in the end of the body/neck
using a bowline knot, the most useful knot I know of. Because
there's so much stretch with this type of nylon string, I find it
advantageous to pull each string as tightly as possible while
cranking the tuner. Cut off any string-end that's more than 3/4"
long or so. Once the instrument is strung and tuned, Screw in the
end-pin screw a bit.
There are several tunings used in Africa. It seems that the tuning
shown in this article stands out as a favorite.
In addition to string stretch, the neck will bow some and the
soundboard will sink in a bit. This all means that the first few
day after stringing & tuning the beast, keeping it in tune will be
a bit of a challenge! After several days the strings & everything
else will have settled & tuning will not have to be often
repeated. I used this type string on a simple cookie-tin banjo I
made for my toddler daughter & (once stretched & settled) it's
been about a year (later note: if you can believe 13 years now!)
since I have had to retouch the tuning.
MUCH LATER NOTE 1/10/2012: After an additional 15 plus years of diddling
with Koras, I must make a "modification" to the above measurements.
ALthough the Cake-Tin Kora will work fine as is, I now think the highest
pitched strings (& each of the other strings except the longest) should
be shorter - ie: the very shortest string should be on the order of
210 mm long instead of what is shown above. I will hopefully revise
the above measurements accordingly as I have time.
In the meantime, you can easily "stretch" the original tuning-gear/string
length by leaving the longest string where it is and then slightly and
uniformly plot each tuner/string end so that the space between each
is a bit increased as you go up the neck - ending at the place high up
the neck where the stringlength (of the shortest string) is 210 mm long.
Plot on a long piece of paper first. Another way to do this is to get a
piece of stretchy sewing elastic, temporarily affix it along the neck
and make marks on the elastic where the tuners/string ends are. Now
(leaving the left end of the elsastic still attached) stretch it out
until the old shortest-string mark is now at the new shortest-string mark.
Fasten the right end of the elastic & make new marks on the neck.
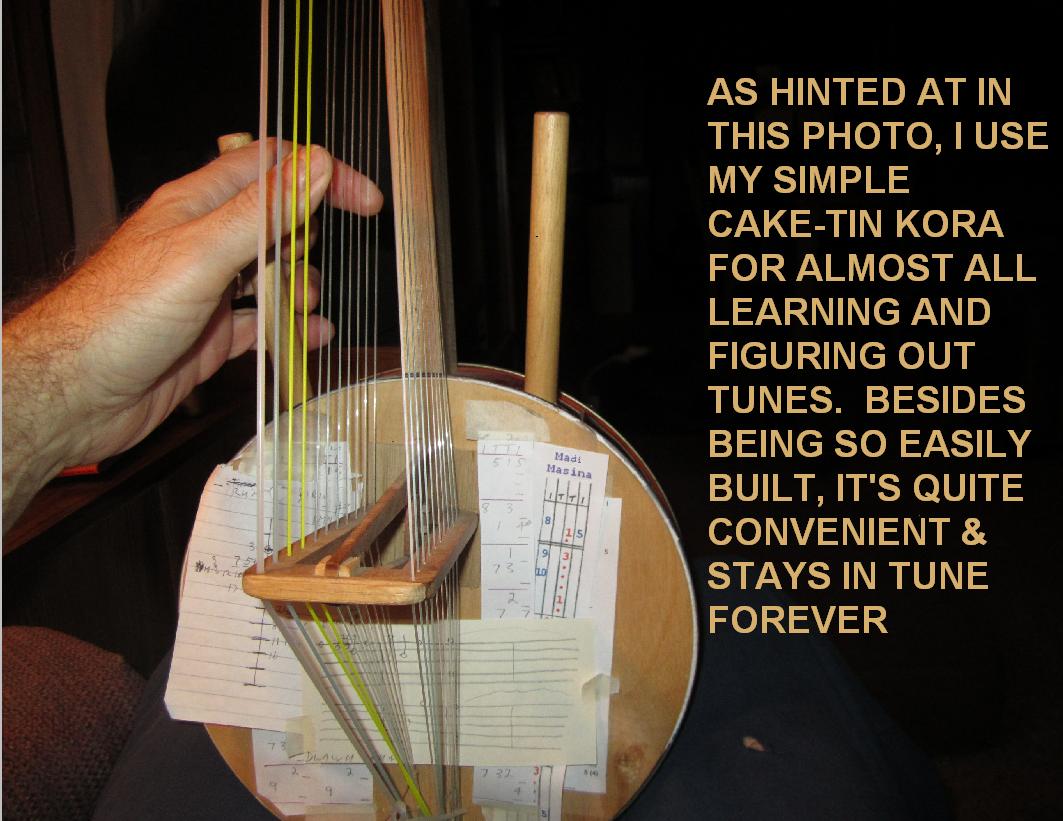
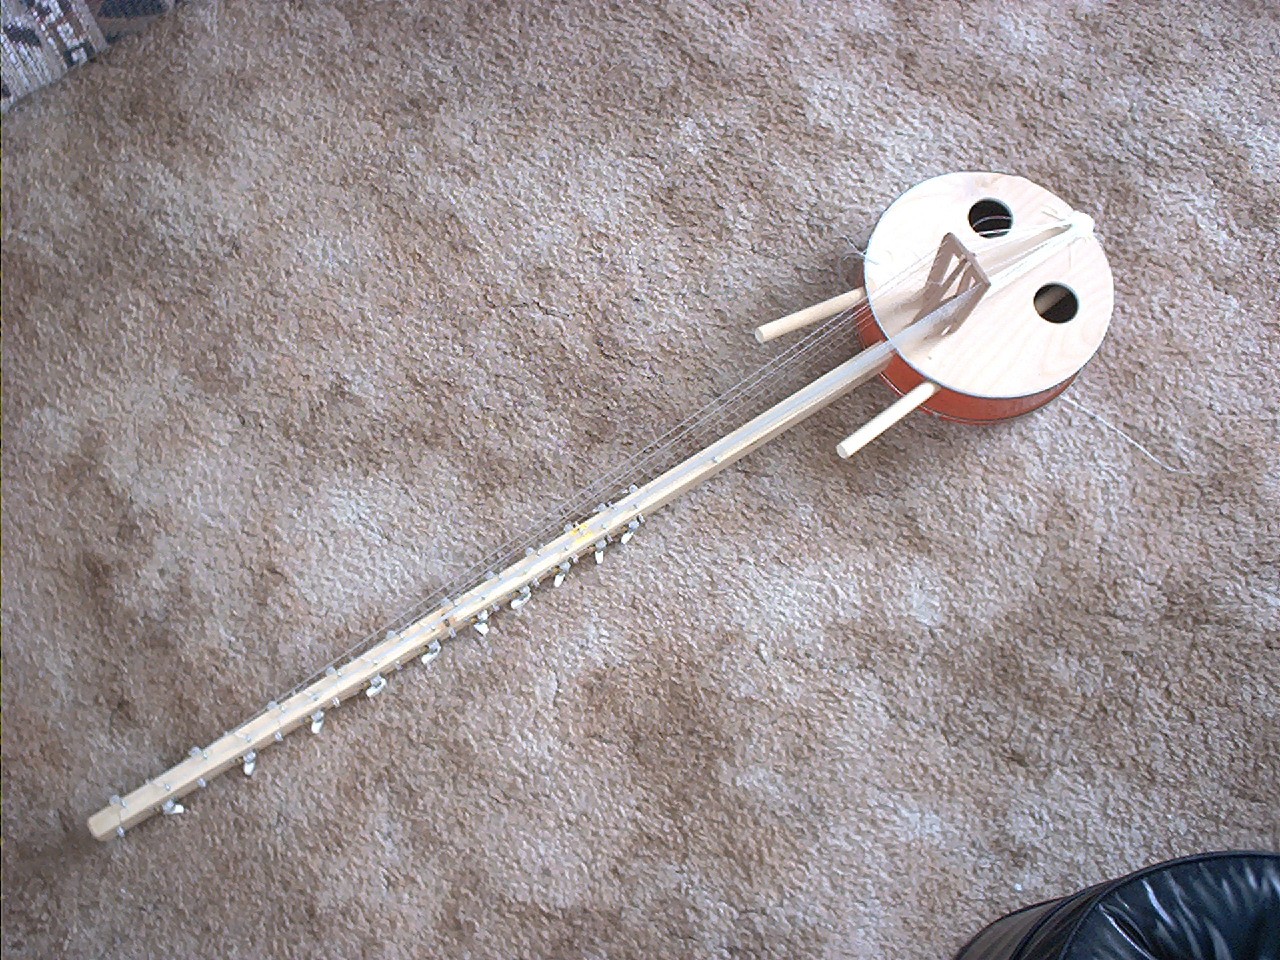
NOW THAT I NO LONGER HAVE A MINISCULE WEBPAGE SPACE RESTRICTION, HERE ARE
A NUMBER OF PHOTOS OF THIS INSTRUMENT THAT FORMERLY WERE ON MY CD.
Some of these pics show the instrument in mid re-stringing:


                            APPENDIX

Re: different types of tuners:
The African-built kora normally uses leather rings slipped up and
down the neck to tension/tune each string.

Alternatively, inexpensive individual guitar tuning machines (as
described in the above article) are the easiest way to go.

Zither pins (several for a dollar from Elderly Instruments,
Lansing, MI & elsewhere) can be used as well, although I have not
tried them on a kora.

At least one photograph I have seen shows an African-built
instrument using friction pegs (fiddle-type, only larger) . This
may be an excellent method. (later note - 2011) I built my "Northern
Michigan Kora" using just such fiddle-type friction pegs and they
work fine)

*******************************************************************

Dennis Havlena - W8MI
Mackinac Straits, northern Michigan

Key words: build make diy kora west africa gambia senegal construct homemade home made
Click here to
access my webpage.